systemdのunitファイルの差分編集方法

systemdのunitファイルの差分編集する方法を初めて知ったのでメモ

ディストリビューションパッケージからインストールしたUnitファイルは、以下を行うことで設定の上書きが出来る

systemctl edit google-fluentd

[Service]
Environment='元の値(存在しなければ空)'
Environment='LOG_ELASTICSEARCH_HOST=dev-log-elastic01'

※そもそもsystemdで環境変数を見てくれないのを忘れていてハマりました

Adventカレンダー 社内Docker環境の話

会社でやっているAdventカレンダー 3日目の記事です。

ここ1年で蓄積したDockerのナレッジを書きます。

弊社では、ローカルの開発環境でDockerを利用しています。

決して安定している開発環境とは言えず、日々ブラッシュアップしている状況ですが、培ったナレッジを書き残します。

dockerネットワークの話

コンテナは起動する事に、排他的な独自のネットワークを作ります。
単純にコンテナを起動するだけであればあまり気にする事はありませんが、IPアドレスによる制限を行っている場合は起動の度にコンテナのIPアドレスが変わる為、ネットワーク設計を考える必要があります。

弊社の環境ではL7のPATHルーティングを必要としますので、以下のような構成になります。

127.0.0.1:80
 ↓
Nginxロードバランサコンテナ
 ↓     ↓
コンテナA  コンテナB

上記の構成の場合、
① NginxロードバランサーコンテナのIPアドレスを固定する。
② X-Forwardedに127.0.0.1を含む場合アクセスを許可する。

の2つの許可方法が考えられますが、①で行うように設定しようと考えました。

docker-composeでコンテナを起動する場合、単一のコンテナだけではなく全てのコンテナにIPアドレスを固定指定する必要がありますが、
上記のようにコンテナが3つだけであれば良いのですが、実際は20ぐらいのコンテナが動いています。

同一ネットワークでNginxロードバランサコンテナだけIPアドレスを固定してみましたが、DHCPレンジとぶつかるケースがコンテナ側の起動が出来ない事がありました。
その為、ネットワークの設定、DHCPプールの設定を行う必要があります。

docker network create --subnet=172.19.0.0/16 --gateway=172.19.0.1 --ip-range=172.19.1.0/24 ネットワーク名

・Dockerネットワーク全体のネットワークは172.19.0.0/16
・ゲートウェイは172.19.0.1
・DHCPレンジは172.19.1.0/24の範囲で設定する。

Dockerネットワーク作成後、172.19.1.0/24 以外を固定IPアドレス設定可能ネットワークとして、通常通りコンテナにIPアドレスを固定しても、
DHCPレンジとのバッティングも発生しなくなりました。

    networks: 
      ネットワーク名:
        ipv4_address: 172.19.0.5

node ビルドの話

nodeのbuild(npm run dev等)がとにかく遅い。
ソースコードをそのままvolumesとしてマウントを行いビルドを行うと、node_modules配下が作られるが、
node_modules配下を”別物として”マウントする事で、ビルドの速度改善が見られた。

services:
  app:
    build:
      context: ./app
    volumes:
      - app/src:/var/www/DocmentRoot
      - node_modules_volume:/var/www/DocmentRoot/node_modules

volumes:
  node_modules_volume:

快適に開発が行える環境までもう一歩。
現在は社内からクレームが多い 「自分の業務とは関係ないコンテナを立ち上げたくない(重い)」の対応を進めているので、
動き始めたらその事も記事に書く予定です。

dkronを触ってみた

crondで動くジョブスケジューラーがSPOFになっているサービスは多いと思う。
自社サービスも例に漏れずに、そうなっているので良さげなジョブスケジューラーが無いのか探していたところ、dkron(https://dkron.io/)というOSSがシンプルで良さげだったので、触ってみた。

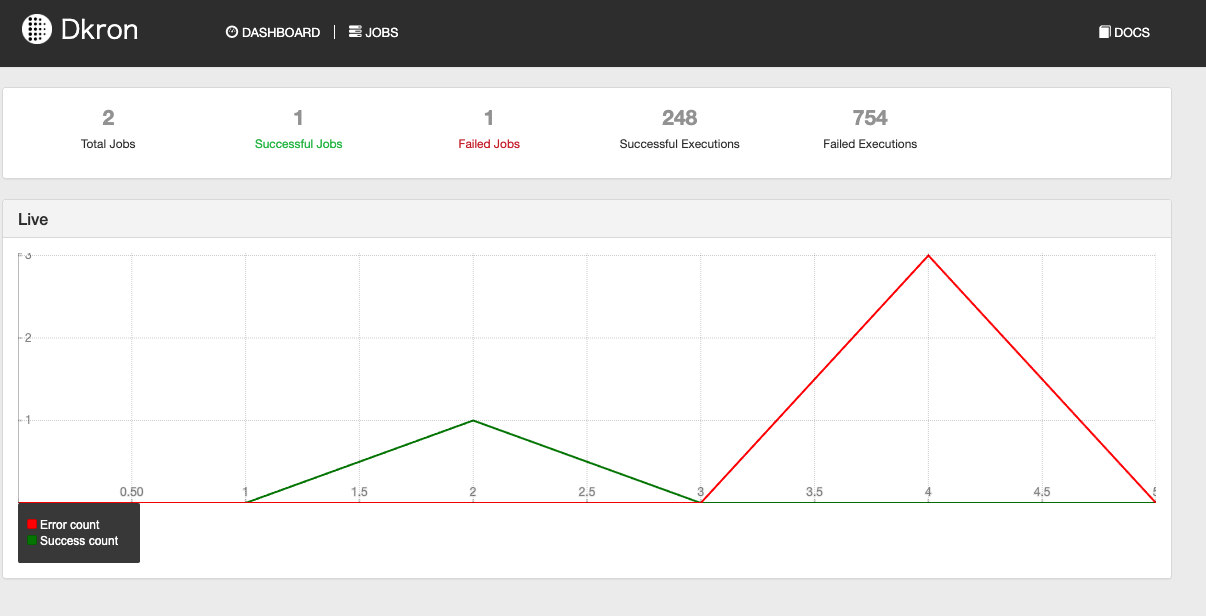
まだ発展途上なのか、GUIの表示で部分部分がおかしい箇所もあるが、crondよりは十分と思える動きです。

バックグラウンドサービス

昨日作ったetcdを使います。
etcdのクラスタ設定でハマった事まとめ

インストール

cat << _EOF > /etc/yum.repos.d/dkron.repo
[dkron]
name=Dkron Pro Private Repo
baseurl=https://yum.fury.io/victorcoder/
enabled=1
gpgcheck=0
_EOF

yum -y install dkron

設定

サーバー3台でクラスタを作成する為、それぞれ設定します。

vim /etc/dkron/dkron.yml

# Dkron example configuration file
backend: etcd
advertise-addr: 192.168.33.10   # bindするアドレス
backend-machine: 127.0.0.1:2379

# 3台ともserver: trueとすると、1台だけはStatusがleavingの状態のままだった為、
# node01 , node02 はserver:true、 node03はfalseとします。
server: true
log-level: info
tags:
  role: batch
#   datacenter: east
# keyspace: dkron
# encrypt: a-valid-key-generated-with-dkron-keygen
join:
  - 192.168.33.10
  - 192.168.33.20
  - 192.168.33.30
# webhook-url: https://hooks.slack.com/services/XXXXXX/XXXXXXX/XXXXXXXXXXXXXXXXXXXX
# webhook-payload: "payload={\"text\": \"{{.Report}}\", \"channel\": \"#foo\"}"
# webhook-headers: Content-Type:application/x-www-form-urlencoded
# mail-host: email-smtp.eu-west-1.amazonaws.com
# mail-port: 25
# mail-username": mailuser
# mail-password": mailpassword
# mail-from": cron@example.com
# mail-subject-prefix: [Dkron]

設定後にdkronを起動します。

systemctl enable dkron
systemctl start dkron

VirtualBoxのポートフォワードの設定後、http://localhost:8080にアクセスすると、dkronのダッシュボードが表示されます。

ジョブは以下のようにjsonで登録します。

{
  "name": "echo-hostname",

  # timezone指定
  "timezone": "Asia/Tokyo",

  # crondと近い書き方。違うのは、[ 秒 分 時 日 月 曜日] と、秒が加わります
  "schedule": "0 * * * * *",
  "owner": "root",
  "owner_email": "", 

  # 多分、単発実行のjobの場合にtrueにするのかな
  "disabled": false, 

  # batch:xは、batchロールの中で何台のノードでジョブを実行するか
  # batch:2であれば、3台中2台のノードで実行する。
  "tags": {
    "role": "batch:2"  
  },
  "retries": 0,
  "parent_job": "",
  "processors": null,

  # 単一ノードで、ジョブの重複実行を許可するなら[allow]、許可しないなら[forbid]
  "concurrency": "forbid",
  "executor": "shell",
  "executor_config": {
    "command": "echo `date +\"%Y/%m/%d %H:%M:%S\"` `hostname`  >> /tmp/host.log",
    "shell": "true"
  },
  "status": "success"
}

確認したこと

フェイルーバーは、特に何も設定しなくても生きているノードで実行されますが、server: true としているノードが存在していないと全体が停止しますので、本番環境であればserver: trueを2台は必須と思われます。

duとdfでディスク使用が異なる場合の対応

先日、開発用サーバーがDiskFullで停止した。
原因はログの肥大化だったので、logrotateを見直して復旧させたのだけど、
duコマンドとdfコマンドのディスク使用に乖離がありすぎたので、その時に行なった対応をメモ

df -h 
Filesystem            Size  Used Avail Use% Mounted on
/dev/vda2              95G   76G   15G  85% /
tmpfs                 939M     0  939M   0% /dev/shm
du -h /
(中略)
15G /

どうやら、logrotateで圧縮したファイルを握っている残留プロセスがあり、消せないファイルとして握られているようだ。

ls -al /proc/*/fd/* | grep deleted

ls: cannot access /proc/28797/fd/255: そのようなファイルやディレクトリはありません
ls: cannot access /proc/28797/fd/3: そのようなファイルやディレクトリはありません
ls: cannot access /proc/self/fd/255: そのようなファイルやディレクトリはありません
ls: cannot access /proc/self/fd/3: そのようなファイルやディレクトリはありません
l-wx------ 1 root   root   64  3月 25 10:44 2019 /proc/12275/fd/1 -> /var/log/zabbix/zabbix_agentd.log-20181202 (deleted)
l-wx------ 1 root   root   64  3月 25 10:44 2019 /proc/12275/fd/2 -> /var/log/zabbix/zabbix_agentd.log-20181202 (deleted)
l-wx------ 1 root   root   64  3月 25 10:44 2019 /proc/12277/fd/1 -> /var/log/zabbix/zabbix_agentd.log-20181202 (deleted)
l-wx------ 1 root   root   64  3月 25 10:44 2019 /proc/12277/fd/2 -> /var/log/zabbix/zabbix_agentd.log-20181202 (deleted)
l-wx------ 1 root   root   64  3月 25 10:44 2019 /proc/12278/fd/1 -> /var/log/zabbix/zabbix_agentd.log-20181202 (deleted)
l-wx------ 1 root   root   64  3月 25 10:44 2019 /proc/12278/fd/2 -> /var/log/zabbix/zabbix_agentd.log-20181202 (deleted)
l-wx------ 1 root   root   64  3月 25 10:44 2019 /proc/12279/fd/1 -> /var/log/zabbix/zabbix_agentd.log-20181202 (deleted)
l-wx------ 1 root   root   64  3月 25 10:44 2019 /proc/12279/fd/2 -> /var/log/zabbix/zabbix_agentd.log-20181202 (deleted)
l-wx------ 1 root   root   64  3月 25 10:44 2019 /proc/12280/fd/1 -> /var/log/zabbix/zabbix_agentd.log-20181202 (deleted)
l-wx------ 1 root   root   64  3月 25 10:44 2019 /proc/12280/fd/2 -> /var/log/zabbix/zabbix_agentd.log-20181202 (deleted)
l-wx------ 1 root   root   64  3月 25 10:44 2019 /proc/12281/fd/1 -> /var/log/zabbix/zabbix_agentd.log-20181202 (deleted)
l-wx------ 1 root   root   64  3月 25 10:44 2019 /proc/12281/fd/2 -> /var/log/zabbix/zabbix_agentd.log-20181202 (deleted)
l-wx------ 1 apache apache 64  3月 25 10:44 2019 /proc/25517/fd/4 -> /var/www/hoge/log/sqllog/sql_debug.log.1 (deleted)
l-wx------ 1 apache apache 64  3月 25 10:44 2019 /proc/25517/fd/7 -> /var/www/hoge/log/sqllog/sql_debug.log.1 (deleted)
lrwx------ 1 root   root   64  3月 26 10:17 2019 /proc/26788/fd/13 -> /tmp/.ZendSem.LtZNfn (deleted)
lrwx------ 1 root   root   64  3月 26 10:17 2019 /proc/3793/fd/13 -> /tmp/.ZendSem.LtZNfn (deleted)
lrwx------ 1 root   root   64  3月 26 10:17 2019 /proc/3795/fd/13 -> /tmp/.ZendSem.LtZNfn (deleted)
lrwx------ 1 root   root   64  3月 26 10:17 2019 /proc/3943/fd/13 -> /tmp/.ZendSem.LtZNfn (deleted)
lrwx------ 1 root   root   64  3月 26 10:17 2019 /proc/4101/fd/13 -> /tmp/.ZendSem.LtZNfn (deleted)
lrwx------ 1 root   root   64  3月 26 10:17 2019 /proc/4141/fd/13 -> /tmp/.ZendSem.LtZNfn (deleted)
lrwx------ 1 root   root   64  3月 26 10:17 2019 /proc/4157/fd/13 -> /tmp/.ZendSem.LtZNfn (deleted)
lrwx------ 1 root   root   64  3月 26 10:17 2019 /proc/4158/fd/13 -> /tmp/.ZendSem.LtZNfn (deleted)
lrwx------ 1 root   root   64  3月 26 10:17 2019 /proc/4159/fd/13 -> /tmp/.ZendSem.LtZNfn (deleted)
lrwx------ 1 root   root   64  3月 26 10:17 2019 /proc/4164/fd/13 -> /tmp/.ZendSem.LtZNfn (deleted)
lrwx------ 1 root   root   64  3月 26 10:17 2019 /proc/4202/fd/13 -> /tmp/.ZendSem.LtZNfn (deleted)
lrwx------ 1 root   root   64  3月 26 10:17 2019 /proc/4203/fd/13 -> /tmp/.ZendSem.LtZNfn (deleted)
lrwx------ 1 root   root   64  3月 26 10:17 2019 /proc/4204/fd/13 -> /tmp/.ZendSem.LtZNfn (deleted)
lrwx------ 1 root   root   64  3月 26 10:17 2019 /proc/4205/fd/13 -> /tmp/.ZendSem.LtZNfn (deleted)
lrwx------ 1 root   root   64  3月 26 10:17 2019 /proc/4206/fd/13 -> /tmp/.ZendSem.LtZNfn (deleted)
lrwx------ 1 root   root   64  3月 26 10:17 2019 /proc/4207/fd/13 -> /tmp/.ZendSem.LtZNfn (deleted)
lrwx------ 1 root   root   64  3月 26 10:17 2019 /proc/4208/fd/13 -> /tmp/.ZendSem.LtZNfn (deleted)
lrwx------ 1 root   root   64  3月 26 10:17 2019 /proc/4333/fd/13 -> /tmp/.ZendSem.LtZNfn (deleted)
lrwx------ 1 root   root   64  3月 25 10:49 2019 /proc/8789/fd/13 -> /tmp/.ZendSem.LtZNfn (deleted)
lrwx------ 1 root   root   64  3月 25 10:49 2019 /proc/8791/fd/13 -> /tmp/.ZendSem.LtZNfn (deleted)
lrwx------ 1 root   root   64  3月 25 10:49 2019 /proc/8809/fd/13 -> /tmp/.ZendSem.LtZNfn (deleted)
lrwx------ 1 root   root   64  3月 25 10:49 2019 /proc/8810/fd/13 -> /tmp/.ZendSem.LtZNfn (deleted)

それが正常なプロセスであればrestartで容量がドカっと解放されるらしいが、今回は残留プロセスなので、
1. zabbix-agentの再起動
2. PID 25517 をkill
したところ、dfでみた場合の容量が正常値に戻った。

df -h
Filesystem            Size  Used Avail Use% Mounted on
/dev/vda2              95G   15G   76G  17% /
tmpfs                 939M     0  939M   0% /dev/shm
ls -al /proc/*/fd/* | grep deleted
ls: cannot access /proc/29831/fd/255: そのようなファイルやディレクトリはありません
ls: cannot access /proc/29831/fd/3: そのようなファイルやディレクトリはありません
ls: cannot access /proc/29832/fd/255: そのようなファイルやディレクトリはありません
ls: cannot access /proc/29832/fd/3: そのようなファイルやディレクトリはありません
ls: cannot access /proc/self/fd/255: そのようなファイルやディレクトリはありません
ls: cannot access /proc/self/fd/3: そのようなファイルやディレクトリはありません
lrwx------ 1 root  root  64  3月 26 10:20 2019 /proc/28922/fd/13 -> /tmp/.ZendSem.iMYqUr (deleted)
lrwx------ 1 root  root  64  3月 26 10:20 2019 /proc/28924/fd/13 -> /tmp/.ZendSem.iMYqUr (deleted)
lrwx------ 1 root  root  64  3月 26 10:20 2019 /proc/28925/fd/13 -> /tmp/.ZendSem.iMYqUr (deleted)
lrwx------ 1 root  root  64  3月 26 10:20 2019 /proc/28926/fd/13 -> /tmp/.ZendSem.iMYqUr (deleted)
lrwx------ 1 root  root  64  3月 26 10:20 2019 /proc/28927/fd/13 -> /tmp/.ZendSem.iMYqUr (deleted)
lrwx------ 1 root  root  64  3月 26 10:20 2019 /proc/28928/fd/13 -> /tmp/.ZendSem.iMYqUr (deleted)
lrwx------ 1 root  root  64  3月 26 10:20 2019 /proc/28929/fd/13 -> /tmp/.ZendSem.iMYqUr (deleted)
lrwx------ 1 root  root  64  3月 26 10:20 2019 /proc/28930/fd/13 -> /tmp/.ZendSem.iMYqUr (deleted)
lrwx------ 1 root  root  64  3月 26 10:20 2019 /proc/28931/fd/13 -> /tmp/.ZendSem.iMYqUr (deleted)
lrwx------ 1 root  root  64  3月 26 10:20 2019 /proc/28932/fd/13 -> /tmp/.ZendSem.iMYqUr (deleted)
lrwx------ 1 root  root  64  3月 26 10:20 2019 /proc/28933/fd/13 -> /tmp/.ZendSem.iMYqUr (deleted)
lrwx------ 1 root  root  64  3月 26 10:20 2019 /proc/28934/fd/13 -> /tmp/.ZendSem.iMYqUr (deleted)
lrwx------ 1 root  root  64  3月 26 10:20 2019 /proc/28935/fd/13 -> /tmp/.ZendSem.iMYqUr (deleted)
lrwx------ 1 root  root  64  3月 26 10:20 2019 /proc/28936/fd/13 -> /tmp/.ZendSem.iMYqUr (deleted)
lrwx------ 1 root  root  64  3月 26 10:20 2019 /proc/28937/fd/13 -> /tmp/.ZendSem.iMYqUr (deleted)
lrwx------ 1 root  root  64  3月 26 10:20 2019 /proc/28938/fd/13 -> /tmp/.ZendSem.iMYqUr (deleted)
lrwx------ 1 root  root  64  3月 26 10:20 2019 /proc/28939/fd/13 -> /tmp/.ZendSem.iMYqUr (deleted)
lrwx------ 1 root  root  64  3月 26 10:20 2019 /proc/28940/fd/13 -> /tmp/.ZendSem.iMYqUr (deleted)
lrwx------ 1 root  root  64  3月 26 10:20 2019 /proc/28941/fd/13 -> /tmp/.ZendSem.iMYqUr (deleted)
lrwx------ 1 root  root  64  3月 26 10:20 2019 /proc/28942/fd/13 -> /tmp/.ZendSem.iMYqUr (deleted)
lrwx------ 1 root  root  64  3月 26 10:20 2019 /proc/28943/fd/13 -> /tmp/.ZendSem.iMYqUr (deleted)

etcdのクラスタ設定でハマった事まとめ

初めてetcdを触ってみたので、個人的にハマったポイントも含めて備忘録を残します。

環境

Mac on VirtualBox
- CentOS Linux release 7.6.1810 (Core)
- kernel 3.10.0-957.10.1.el7.x86_64
- etcd Version: 3.3.11

インストール

yum でサクッと。

yum -y install etcd

config

/etc/etcd/etcd.conf

ETCD_DATA_DIR="/var/lib/etcd/default.etcd"
ETCD_LISTEN_PEER_URLS="http://192.168.33.10:2380"
ETCD_LISTEN_CLIENT_URLS="http://0.0.0.0:2379"
ETCD_NAME="node01"
ETCD_INITIAL_ADVERTISE_PEER_URLS="http://192.168.33.10:2380"
ETCD_ADVERTISE_CLIENT_URLS="http://192.168.33.10:2379"
ETCD_INITIAL_CLUSTER="node01=http://192.168.33.10:2380,node02=http://192.168.33.20:2380,node03=http://192.168.33.30:2380"
ETCD_INITIAL_CLUSTER_TOKEN="etcd-cluster"
ETCD_INITIAL_CLUSTER_STATE="new"

ここまでは、
http://www.usupi.org/sysad/277.html とか
https://qiita.com/hana_shin/items/602f98bd9b153d22e50c
に記載がある通り。

この状態で、

systemctl enable etcd
systemctl start etcd

として、クラスタの状態を確認しても、なぜかpeerURLs=http://localhost:2380 とボッチ状態になる。

etcdctl member list
8e9e05c52164694d: name=node01 peerURLs=http://localhost:2380 clientURLs=http://192.168.33.20:2379 isLeader=true

解決方法

systemdの設定を見てみる

cat /usr/lib/systemd/system/etcd.service
(中略)
ExecStart=/bin/bash -c GOMAXPROCS=$(nproc) /usr/bin/etcd --name="${ETCD_NAME}" --data-dir="${ETCD_DATA_DIR}" --listen-client-urls="${ETCD_LISTEN_CLIENT_URLS}"

クラスタで起動させるには、

etcd --name node01 --listen-peer-urls http://192.168.33.10:2380 --initial-advertise-peer-urls http://192.168.33.10:2380 --initial-cluster node01=http://192.168.33.10:2380,node03=http://192.168.33.30:2380,node03=http://192.168.33.30:2380

こんな感じの設定を投げてあげる必要があるので、systemdを修正

vim /usr/lib/systemd/system/etcd.service
(中略)
# ExecStart=/bin/bash -c GOMAXPROCS=$(nproc) /usr/bin/etcd --name="${ETCD_NAME}" --data-dir="${ETCD_DATA_DIR}" --listen-client-urls="${ETCD_LISTEN_CLIENT_URLS}"

ExecStart=/bin/bash -c "GOMAXPROCS=$(nproc) /usr/bin/etcd --name ${ETCD_NAME} --listen-peer-urls ${ETCD_LISTEN_PEER_URLS} --initial-advertise-peer-urls ${ETCD_INITIAL_ADVERTISE_PEER_URLS} --initial-cluster ${ETCD_INITIAL_CLUSTER}"

・・・失敗

/var/log/messageを見てみる

Mar 25 16:39:13 node01 systemd: Starting Etcd Server...
Mar 25 16:39:13 node01 etcd: recognized and used environment variable ETCD_ADVERTISE_CLIENT_URLS=http://192.168.33.10:2379
Mar 25 16:39:13 node01 etcd: recognized and used environment variable ETCD_DATA_DIR=/var/lib/etcd/default.etcd
Mar 25 16:39:13 node01 etcd: recognized and used environment variable ETCD_INITIAL_CLUSTER_STATE=new
Mar 25 16:39:13 node01 etcd: recognized and used environment variable ETCD_INITIAL_CLUSTER_TOKEN=etcd-cluster
Mar 25 16:39:13 node01 etcd: recognized and used environment variable ETCD_LISTEN_CLIENT_URLS=http://0.0.0.0:2379
Mar 25 16:39:13 node01 etcd: recognized and used environment variable ETCD_STRICT_RECONFIG_CHECK=true
Mar 25 16:39:13 node01 etcd: recognized environment variable ETCD_LISTEN_PEER_URLS, but unused: shadowed by corresponding flag
Mar 25 16:39:13 node01 etcd: recognized environment variable ETCD_NAME, but unused: shadowed by corresponding flag
Mar 25 16:39:13 node01 etcd: recognized environment variable ETCD_INITIAL_ADVERTISE_PEER_URLS, but unused: shadowed by corresponding flag
Mar 25 16:39:13 node01 etcd: recognized environment variable ETCD_INITIAL_CLUSTER, but unused: shadowed by corresponding flag

EnvironmentFile=-/etc/etcd/etcd.confで読ませている設定が読まれて、、、 but unused??

ググると以下の記事があった
https://qiita.com/kobanyan/items/f8e8a3bd5406e1d290fb
変数展開出来ないのか

環境変数で読み込んでいるし、変なパラメータを外すと正常に動作した
CentOSのパッケージで読み込んだsystemdファイルがそもそも意味をなさなかったのか・・・

vim /usr/lib/systemd/system/etcd.service
#ExecStart=/usr/bin/etcd --name ${ETCD_NAME} --listen-peer-urls ${ETCD_LISTEN_PEER_URLS} --initial-advertise-peer-urls ${ETCD_INITIAL_ADVERTISE_PEER_URLS} --initial-cluster ${ETCD_INITIAL_CLUSTER}
ExecStart=/bin/bash -c "GOMAXPROCS=$(nproc) /usr/bin/etcd"

改めてクラスタメンバーの確認

etcdctl member list
254ec0e332be2d7d: name=node01 peerURLs=http://192.168.33.10:2380 clientURLs=http://192.168.33.10:2379 isLeader=true
5ddb7be38d856804: name=node02 peerURLs=http://192.168.33.20:2380 clientURLs=http://192.168.33.20:2379 isLeader=false
9cb2cdf44208202b: name=node03 peerURLs=http://192.168.33.30:2380 clientURLs=http://192.168.33.30:2379 isLeader=false

問題なさそう

ec2のsquidでグローバルIPを分散するProxyを作る

これはAdventure Advent Calendar 2018の13日目の記事です。(後追い)

プロキシサーバーと言えばsquidと思い浮かべるように、どメジャーなミドルウェアですが、今回はsquidを使って「複数のグローバルIPでインターネットにアクセスするプロキシサーバー」を作ってみました。

複数人でプロキシサーバーを使ったアクセスを行うと、すぐに接続元IPアドレスによるアクセス拒否が行われてしまうサイトにアクセスする際にどうぞ。

ec2を立てる

インスタンスのサイズによって、インターフェイスあたりの IPv4 アドレスの最大数が異なりますので以下を参考にして下さい。

https://docs.aws.amazon.com/ja_jp/AWSEC2/latest/UserGuide/using-eni.html

今回はt2.largeにし、
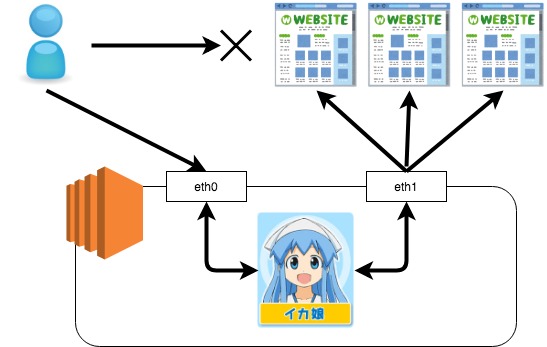
eth0の18080ポートで、外部からの通信を受け入れ、
eth1に9個のセカンダリプライベートIPをアサインして、それぞれにElasticIPを付け、計10個のIPアドレスからインターネットに出るようにしたいと思います。

インスタンスを作る上で注意する点は、最初からeth1を作成する事ぐらいです。
(後からでも追加出来ますが、インスタンスを停止してeth1をアタッチし、また起動するという手間があります)

なお、今回はAmazon Linux 2 AMI (HVM), SSD Volume Typeで作成しています。

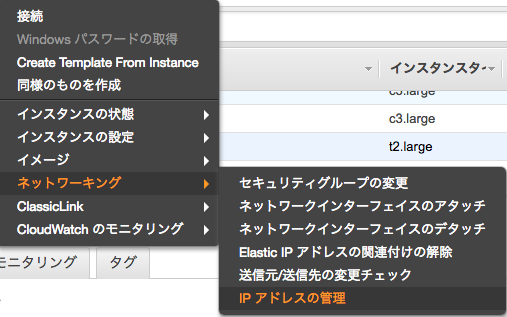
インスタンスが起動したら、メニューからIPアドレスの管理を選択します。

eth1側に必要な数分、プライベートIPを割り当てます。
ここでは、DHCPでアドレスが割り当たりませんので、手動で入力していく必要があります。
(当たり前ですが、eth1が所属するサブネットの範囲で割り当てて下さい)

なお、eth1のeni-で始まる管理番号は、次で利用しますので控えておいて下さい。

忘れないように、セキュリティグループの穴あけもやっておきましょう。

ElasticIPを発行する

ElasticIPを発行します。
ここで注意する点は、
eth1のセカンダリIPアドレスに割り当てるElasticIPは、ネットワークインターフェイスでのみ検索、表示出来る。
という点です。
ラジオボタンがインスタンスのままだと表示されません。

複数のグローバルIPアドレス分、この割り当て作業を繰り返します。

squidを立てる

最後にsquidの設定です

sudo yum -y install squid

以下は/etc/squid/squid.confの抜粋です

 # proxyを使う接続元IP
acl mynetwork src xxx.xxx.xxx.xxx/32

 # 今回10個のIPをランダムで使う
acl balance random 1/10
balance_on_multiple_ip on

# LISTENポート
http_port 18080

# 帯域を潰されたくないので、特定の動画サイトのドメインは見せないようにする
acl blacklist dstdomain "/etc/squid/blacklist"
# 非読化
visible_hostname unkown
forwarded_for off
request_header_access X-FORWARDED-FOR deny all
request_header_access Via deny all
request_header_access Cache-Control deny all

# ファイルディスクリプタの上限変更
max_filedesc 65535

# ElasticIPに紐付けたセカンダリIP
tcp_outgoing_address 172.30.2.211 balance 
tcp_outgoing_address 172.30.2.212 balance 
tcp_outgoing_address 172.30.2.213 balance 
tcp_outgoing_address 172.30.2.214 balance 
tcp_outgoing_address 172.30.2.215 balance 
tcp_outgoing_address 172.30.2.216 balance 
tcp_outgoing_address 172.30.2.217 balance 
tcp_outgoing_address 172.30.2.218 balance 
tcp_outgoing_address 172.30.2.219 balance 
tcp_outgoing_address 172.30.2.220 balance 

/etc/squid/blacklistには主要な動画サイトのドメインを書いておきます

www.youtube.com
www.nicovideo.jp
gyao.yahoo.co.jp
www.happyon.jp
www.netflix.com

squidの自動起動と開始

sudo systemctl enable squid
sudo systemctl start squid

エラーが無く起動が出来れば、eth0に割り当てたElasticIPの18080をブラウザのプロキシに設定し、IP確認くんなどで通信確認とeth1のセカンダリIPアドレスに割り当てたElasticIPで通信が行えているか確認をしてみて下さい。

python3.7のソースインストール

cd /usr/local/src/

wget https://www.python.org/ftp/python/3.7.1/Python-3.7.1.tgz

tar zxvf Python-3.7.1.tgz

cd /usr/local/src/Python-3.7.1

yum groupinstall 'Development Tools'

# ncurses-develは、bpythonを使わないなら不要
yum install openssl-devel libffi-devel ncurses-devel

./configure prefix=/usr/local/python3.7;make;make install

terraform の 変数ファイルの読み込み方法

以前は、variables.tfに

variable "project" {
  default = {
    id          = "zuu-infra"
    name        = "zuu-infra"
    region      = "asia-northeast1"
    description = "create from terraform"
  }
}

variable "domain" {
  default = {
    step       = "common-step.zuuonline.com"
    zabbix-web = "zbx.zuuonline.com"
    relay      = "relay.zuuonline.com"
    redash     = "redash.zuuonline.com"
    zabbix     = "zbx.zuuonline.com"
    grafana    = "grafana.zuuonline.com"
    vuls       = "vuls.zuudev.com"
  }
}

と書いて読み込ませていた為、実行する対象が変わる度にvariables.tfファイルを差し替えしていた。

実ファイルを動かすのは宜しくないので、調べたところ

-vars-file=xxxx.tfvars

実行時とオプションで、ファイルを読み込ませられるようだ。

調べて、色々勘違いしていた事もあり勉強になったので書いておく。

ファイルは以下の3つ

vpc.tf
  └ 実際のリソース定義

variables.tf
  └ -vars-file=c.tfvars で渡された内容を「変数」として定義する。tfファイルと同じ場所に置く

c.tfvars
  └ -vars-file=c.tfvars で渡す。 場所はどこでも良い(tfファイルからの相対パスか絶対パス)

variables.tfは、「変数」として定義するだけなので、

variable "credential" {
    type = "map"
    // c.tfvarsで情報が設定されていない場合のデフォルト値
    default = {
        "auth_file"   = "~/.ssh/dev-project.json",
        "project"     = "dev-project",
        "zones"       = "us-east-1a",
        "description" = "create from terraform"
    }
}
// VPC
variable "vpc" {
    type = "map"
}

このような感じで定義する。

c.tfvars は、variables.tf の typeに合うように変数を書く。
書き方は、以下のどちらでも認識した。

// procject
credential = {
    "auth_file" = "~/.ssh/hoge.json",
    "project" = "stg-project",
    "zones"   = "us-east-1a",
    "description" = "create from terraform"
}

// vpc
vpc = {
    vpc_name = "stg-project-network"
    network  = "172.24.0.0/22"
    autoscale_network_cidr = "172.168.0.0/24"
    autoscale_network_name    = "subnet1"
    autoscale_network_region  = "us-east1"
    none_autoscale_network_cidr = "172.168.2.0/24"
    none_autoscale_name    = "subnet2"
    none_autoscale_region  = "us-east1"
}

最後に、a.tf
これはリソースの定義なので、以前から書いている内容から変更は無いが、念の為に残しておく。

resource "google_compute_network" "vpc" {
  name         = "${lookup(var.vpc, "vpc_name")}"
  description  = "${lookup(var.credential, "description")}"
  auto_create_subnetworks = "false"
}

resource "google_compute_subnetwork" "subnet1" {
  depends_on    = ["google_compute_network.vpc"]
  name          = "${lookup(var.vpc, "autoscale_network_name")}"
  network       = "${lookup(var.vpc, "vpc_name")}"
  ip_cidr_range = "${lookup(var.vpc, "autoscale_network_cidr")}"
  region        = "${lookup(var.vpc, "autoscale_network_region")}"
  private_ip_google_access = true
}

resource "google_compute_subnetwork" "subnet2" {
  depends_on    = ["google_compute_network.vpc"]
  name          = "${lookup(var.vpc, "none_autoscale_network_name")}"
  network       = "${lookup(var.vpc, "vpc_name")}"
  ip_cidr_range = "${lookup(var.vpc, "none_autoscale_network_cidr")}"
  region        = "${lookup(var.vpc, "none_autoscale_network_region")}"
  private_ip_google_access = true
}

GCPのstartupスクリプトでどハマりしたメモ

VM インスタンスの特別な構成これ通りにNATゲートウェイを構築しようとして、ハマった箇所のメモ

実行したコマンドは以下の通り
開発環境なので、一部は手動でコマンドを置き換えています

# startup.sh取得
gsutil cp gs://nat-gw-template/startup.sh .

# インスタンステンプレート作成(nat-1)
gcloud compute instance-templates create nat-1 \
    --image-family=centos-7  --tags natgw \
    --image-project=centos-cloud \
    --machine-type n1-standard-1 --can-ip-forward \
    --metadata-from-file=startup-script=startup.sh --address グローバルIPアドレス1

# インスタンステンプレート作成(nat-2)
gcloud compute instance-templates create nat-2 \
    --image-family=centos-7 --tags natgw \
    --image-project=centos-cloud \
    --machine-type n1-standard-1 --can-ip-forward \
    --metadata-from-file=startup-script=startup.sh --address グローバルIPアドレス2

# ヘルスチェック作成
gcloud compute health-checks create http nat-health-check --check-interval 2 \
    --timeout 1 \
    --healthy-threshold 1 --unhealthy-threshold 2 --request-path /health-check

# インスタンスグループ作成(nat-1)
gcloud compute instance-groups managed create nat-1 \
    --size=1 --template=nat-1 --zone=asia-northeast1-a

# インスタンスグループ作成(nat-2)
gcloud compute instance-groups managed create nat-2 \
    --size=1 --template=nat-2 --zone=asia-northeast1-a

# ルート作成(nat-1)
gcloud compute routes create nat-1 --destination-range 0.0.0.0/0 \
    --tags noip --priority 800 --next-hop-instance-zone asia-northeast1-a \
    --next-hop-instance nat-1-5h46 \
    --network=default

# ルート作成(nat-2)
gcloud compute routes create nat-2 --destination-range 0.0.0.0/0 \
    --tags noip --priority 800 --next-hop-instance-zone asia-northeast1-a \
    --next-hop-instance nat-2-r3kn \
    --network=default

これで、ネットワークタグ「noip」を付けたインスタンスのルートがnat-1 / nat-2 を通って出て行くはず

 while :; do sleep 1 ;date; curl httpbin.org/ip --connect-timeout 1 ; done

2018年 11月 12日 月曜日 18:50:03 JST
curl: (28) Connection timed out after 1005 milliseconds
2018年 11月 12日 月曜日 18:50:05 JST
curl: (28) Connection timed out after 1005 milliseconds
2018年 11月 12日 月曜日 18:50:07 JST
curl: (28) Connection timed out after 1005 milliseconds

ダメじゃん

内容を確認すると、startup.shに記載されている

echo 1 > /proc/sys/net/ipv4/ip_forward

が実行されていない。

何これ?何で?と思いつつ数時間調べたけど、結局原因わからない。

理由は分からないけど、startup.shに

#!/bin/bash
timedatectl set-timezone Asia/Tokyo (追加)
echo 1 > /proc/sys/net/ipv4/ip_forward
iptables -t nat -A POSTROUTING -o eth0 -j MASQUERADE

したらecho 1 > /proc/sys/net/ipv4/ip_forwardも動くようになった。
改行コードか?

時間を無駄にした

最新バージョンのgitをインストールする

最新バージョンはここから確認する

環境はGCPのCentOS7

yum groupinstall 'Development Tools'
yum -y install zlib-devel perl-ExtUtils-MakeMaker

cd /usr/local/src
wget https://mirrors.edge.kernel.org/pub/software/scm/git/git-2.9.5.tar.gz
tar zxvf git-2.9.5.tar.gz 
cd git-2.9.5
./configure --prefix /usr/local/git-2.9.5
make
make install
git --version
git version 2.9.5