GCEインスタンスでpostgresqlをフェイルオーバーさせる

GCEでは、単一インスタンスに同一ネットワークのIPアドレスを複数持たせる事ができない。
複数のネットワーク インターフェースの概要と例

つまり、Virtual IPを同一セグメントに持たせた構成は出来ない。
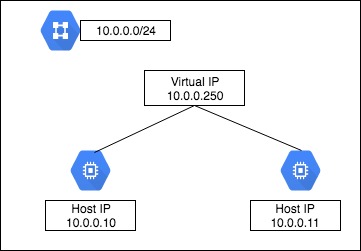
クラスタを組みたかったけど、今回の要件としては

1. Active/Standbyの構成にする
2. Activeのpostgresが止まった場合、Standbyを昇格する
3. フェイルバックは行わない。
4. フェイルオーバー後、App側で検知。
   必要な設定変更後、動的にサービスの再起動を行う。
5. 1分以内にサービスが復旧される。

とシンプルな構成にする。

PostgreSQL

要件1、2には、pg_keeperを使う。
クラスタでは無いのでスプリットブレインの検知などは出来ない。
その為、アプリケーション側に今のActive機の情報を教える必要がある。

スプリットブレイン対策用のDB、Table作成

postgres=#  create database pg_state;
postgres=#  create table failover_log (unixtime int, host varchar(10));

インストール(Actice/Standby共に)

cd /usr/local/src

git clone https://github.com/MasahikoSawada/pg_keeper.git

export PATH=/usr/pgsql-9.6/bin/:$PATH

make USE_PGXS=1

make USE_PGXS=1 install

postgresql.conf書き換え(Actice/Standby共に)

vim postgresql.conf

shared_preload_libraries = 'pg_keeper'
pg_keeper.my_conninfo = 'host=10.0.0.10 port=5432 dbname=postgres'
pg_keeper.partner_conninfo = 'host=10.0.0.11 port=5432 dbname=postgres'
pg_keeper.keepalive_time = 2
pg_keeper.keepalive_count = 3
pg_keeper.after_command = 'sleep 1 ; psql -d pg_state -c "insert into failover_log values(`date +%s`, \'`hostname`\');" -x'

Activeが止まった場合、pg_keeper.keepalive_time秒 × pg_keeper.keepalive_count回 チェックを行い、全てNGの場合にフェイルオーバーを実行し、最後にpg_keeper.after_commandの内容が実行される。
今回は、フェイルオーバー後に[unixtimestamp, hostname]を pg_state.failover_logに入れている。

app側

これはアプリケーションのよるので参考まで。
monitor_master_db.pyというモニタリングスクリプトを作成し、root権限で動かす事にした。
動きとしては、Active/Standby両機のDBのpg_state.failover_logをチェックし、タイムスタンプが若い方をDB接続先として、設定ファイル(yaml)を書き換えデーモンの再起動を行う。

#!/bin/env python3

import os,sys
import yaml
import psycopg2
import codecs
import subprocess

yaml_file = '/PATH/TO/env.yaml'
dbs = ['postgresql://postgres@db01:5432/pg_state'
         ,'postgresql://postgres@db02:5432/pg_state']

def get_item():
    arr = []
    for db in dbs :
        try:
            dbcon = psycopg2.connect(db)
            cur = dbcon.cursor()
            cur.execute('select * from failover_log order by unixtime desc limit 1')
            result = cur.fetchone()
            cur.close()
            dbcon.close()
            arr.append(result)
        except :
            pass
    if len(dbs) == len(arr):    # Active/Standby共にデータ取得成功
        if arr[0][0] > arr[1][0]:
            return arr[0][1]
        else :
            return arr[1][1]

    else :                             # 片系が停止している
        return arr[0][1]


def overwrite(db_name):
    with codecs.open(yaml_file, 'r', 'utf-8') as read :
        env_dict = yaml.load(read)

        if env_dict['db_master'][0]['address'] != '{}:5432'.format(db_name) or env_dict['db_slave'][0]['address'] != '{}:5432'.format(db_name):
            env_dict['db_master'][0]['address'] = '{}:5432'.format(db_name)
            env_dict['db_slave'][0]['address'] = '{}:5432'.format(db_name)

            with codecs.open(yaml_file, 'w', 'utf-8') as write :
                yaml.dump(env_dict, write, encoding='utf8', allow_unicode=True, default_flow_style=False)

            try:
                subprocess.check_call(["systemctl", "restart", "デーモン"])
            except :
                pass

作成したmonitor_master_db.pyをcronで動かす。
cronは普通に書くと1分が最小の実行単位だが、以下のように書くと5秒単位でスクリプトを実行してくれる。

# 5秒間隔
* * * * * for i in `seq 1 12`;do sleep 5; python3 /usr/local/bin/monitor_master_db.py; done

# 10秒間隔の場合
* * * * * for i in `seq 1 6`;do sleep 10; python3 /usr/local/bin/monitor_master_db.py; done

この状態で、Active側のDBを落として、フェイルオーバーされApp側の接続先も変更される事を確認する。
Slave側が昇格前にfailover_logへのinsertが実行される場合、pg_keeper.after_commandのsleepを大きくする。

pg_keeper.after_command = 'sleep 5 ; psql -d pg_state -c "insert into failover_log values(`date +%s`, \'`hostname`\');" -x'
fluentdでMySQLにデータを入れる

https://github.com/tagomoris/fluent-plugin-mysqlを使って、fluentd-3.xでmysql 5.7にログを入れる方法のメモ

同時にbigqueryに対してもログを入れているので、@type copyを使う。

<match xxx.yyyy.accesslog>
  @type copy

  # bigquery用
  <store>
    @type             bigquery
    auth_method       json_key
    json_key          PATH/TO/FILE
    project           GCP PROJECT
    dataset           ${tag[0]}
    table             ${tag[1]}_${tag[2]}_%Y%m%d
    auto_create_table true
    schema_path       /etc/td-agent/schema.json

    <buffer tag,time>
      @type file
      path        /var/log/td-agent/buffer/papillon_accesslog
      timekey 1d
      chunk_limit_size 1000000
      queue_limit_length 128
      flush_interval 1
      retry_max_times 17
      retry_wait 1s
    </buffer>
    <inject>
      time_key time
      time_format %Y-%m-%d %H:%M:%S
    </inject>
  </store>

  # MySQL用にTimeをISO8061からDATETIMEに変換する。
  <store>
    @type record_reformer
    output_tag mysql.${tag_suffix[0]}   # tag名に「mysql」を追加
    enable_ruby true     # ruby有効化
    auto_typecast true
    <record>
      time ${require 'time'; Time.parse(record["time"]).strftime("%Y/%m/%d %H:%M:%S")} # TimeをISO8061からDATETIME
    </record>
  </store>
</match>


<match mysql.xxx.yyyy.accesslog>
    @type mysql_bulk
    host 10.254.0.xx
    database TABLE
    username USER
    password PASSWORD
    column_names time,user_id,uri,referer,remote_ip
    key_names time,user_id,uri,referer,remote_ip
    table log
    transaction_isolation_level read_committed    # 2018/5から、デフォルト値がnulになったので、指定しないとトランザクション貼れない。
    flush_interval 1s
</match>

ハマったのは、

transaction_isolation_level read_committed  

の記述の部分。

ここ以外の記述で、td-agentはちゃんと動くが、

2018-06-01 20:30:30 +0900 [warn]: #0 failed to flush the buffer. retry_time=4 next_retry_seconds=2018-06-01 20:30:30 +0900 chunk="56d92e8467c4fab0440db16ee36f0d34" error_class=Mysql2::Error error="You have an error in your SQL syntax; check the manual that corresponds to your MySQL server version for the right syntax to use near '' at line 1"

こんなエラーが出る。

mysql側でgeneral_logを有効にするも、

2018-06-01T20:30:46.022528+09:00           14 Connect   logger@fluentd01 on accesslog using TCP/IP
2018-06-01T20:30:46.023467+09:00           14 Query     SHOW COLUMNS FROM log
2018-06-01T20:30:46.024207+09:00           14 Quit

と、全然有用なログじゃないし。

結局、tcpdumpを取得して見たら、分離レベルを指定せずに 「SET SESSION TRANSACTION ISOLATION LEVEL」を投げている事が原因だった。

解決してよかったー

ansibleでタスクをスキップしても同名のregisterが設定される

ansibleでデプロイするタスクを書いていて遭遇した仕様の話。

やりたいことは、gitのtagやbranch名を引っ張ってきてslackに通知したい。
ステージング環境でのデプロイでも使っているタスクなので、「masterブランチのtag」が入るか、「develop/test」などのブランチが入ってきても適切に通知したい。

最初は、

# branchがmasterの場合、gittagにtag名を入れる
  - name: git status
    shell: git status | head -1 | awk '{print $2}'
    args:
      chdir: "{{ workdir }}/{{ repobase }}/{{ project }}"
    register: branch_name
    changed_when: false

  - name: check tag version
    shell: git status | head -1 | awk '{print $5}'
    args:
      chdir: "{{ workdir }}/{{ repobase }}/{{ project }}"
    register: gittag
    when: branch_name.stdout == "HEAD"
    changed_when: false


# branchがmasterではない場合、gittagにブランチ名を入れる
  - name: check branch
    shell: git status --short --branch | awk '{print $2}'
    args:
      chdir: "{{ workdir }}/{{ repobase }}/{{ project }}"
    register: gittag
    when: branch_name.stdout != "HEAD"
    changed_when: false

# slack送信
  - name : send tag (finish)
    slack:
      token: '{{ slack_token }}'
      msg: "デプロイが開始します\n
            ``` 
            project: {{project}}\n
            env: {{env}}\n
            version: {{ gittag.stdout }}\n
            date: {{ lookup(\"pipe\",\"date +%Y/%m/%d-%H:%M:%S\") }}
            ```"
      channel: '{{ post_channel }}'
      color: good
    run_once: true

と書いたが、branchがmasterで、check branchタスクがskipされているにも関わらず、register: gittagの中身が空っぽになる。
公式を確認すると、

If a task fails or is skipped, the variable still is registered with a failure or skipped status, the only way to avoid registering a variable is using tags.

タスクが失敗したり、スキップしたりした場合も変数は設定される。
らしい。

結局、以下のように修正。

  vars_files:
    - ../vars/vars.yml
  tasks:

# branchがmasterの場合、gittagにtag名を入れる
  - name: git status
    shell: git status | head -1 | awk '{print $2}'
    args:
      chdir: "{{ workdir }}/{{ repobase }}/{{ project }}"
    register: branch_name
    changed_when: false

  - name: check tag version
    shell: git status | head -1 | awk '{print $5}'
    args:
      chdir: "{{ workdir }}/{{ repobase }}/{{ project }}"
    register: gittag
    when: branch_name.stdout == "HEAD"
    changed_when: false


# branchがdevelopではない場合、gittagにブランチ名を入れる
  - name: check branch
    shell: git status --short --branch | awk '{print $2}'
    args:
      chdir: "{{ workdir }}/{{ repobase }}/{{ project }}"
    register: gitbranch
    when: branch_name.stdout != "HEAD"
    changed_when: false

# slack送信
  - name : send tag (finish)
    slack:
      token: '{{ slack_token }}'
      msg: "デプロイを開始します\n
            ``` 
            project: {{project}}\n
            env: {{env}}\n
            version: {{ gittag.stdout }}\n
            date: {{ lookup(\"pipe\",\"date +%Y/%m/%d-%H:%M:%S\") }}
            ```"
      channel: '{{ post_channel }}'
      color: good
    when: branch_name.stdout == "HEAD"
    run_once: true


  - name : send branch (finish)
    slack:
      token: '{{ slack_token }}'
      msg: "デプロイを開始します\n
            ``` 
            project: {{project}}\n
            env: {{env}}\n
            version: {{ gitbranch.stdout }}\n
            date: {{ lookup(\"pipe\",\"date +%Y/%m/%d-%H:%M:%S\") }}
            ```"
      channel: '{{ post_channel }}'
      color: good
    when: branch_name.stdout != "HEAD"
    run_once: true

上手い書き方無いかなぁ

CentOS7のファイルディスクリプタの設定

確認方法

cat /proc/`pgrep -f サービス名`/limits

Limit                     Soft Limit           Hard Limit           Units     
Max cpu time              unlimited            unlimited            seconds   
Max file size             unlimited            unlimited            bytes     
Max data size             unlimited            unlimited            bytes     
Max stack size            8388608              unlimited            bytes     
Max core file size        0                    unlimited            bytes     
Max resident set          unlimited            unlimited            bytes     
Max processes             29222                29222                processes 
Max open files            1024                1024                files     
Max locked memory         65536                65536                bytes     
Max address space         unlimited            unlimited            bytes     
Max file locks            unlimited            unlimited            locks     
Max pending signals       29222                29222                signals   
Max msgqueue size         819200               819200               bytes     
Max nice priority         0                    0                    
Max realtime priority     0                    0                    
Max realtime timeout      unlimited            unlimited            us        

変更方法

/usr/lib/systemd/system/サービス管理ファイル に、

LimitNOFILE=65536

を追加する。

追加した跡は、

systemctl daemon-reload
systemctl restart daemon

として、サービスを再起動する。

pecoで遊んでみる

Twitterでやり取りさせて貰っているShu1さんの記事が面白かったので、GCEで再現してみた
http://blog.jicoman.info/2018/04/ec2-ssh-using-peco/

※ gcloudの設定が終わっている事前提

pecoインストール

wget https://github.com/peco/peco/releases/download/v0.5.3/peco_linux_amd64.tar.gz

tar zxvf peco_linux_amd64.tar.gz
mv peco_linux_amd64/peco /usr/local/bin/
rm -rf peco_linux_amd64*

関数設定

vim ~/.bash_profile

# ssh簡単にするやつ
function ssh-gce() {
  local user="root"
  local host=$(gcloud compute instances list | grep stg | awk '{print $1,$3,$4}' | column -t -s" " | /usr/local/bin/peco | awk '{print $3}')
  ssh "$user@$host"
}

修正後に、

source ~/.bash_profile

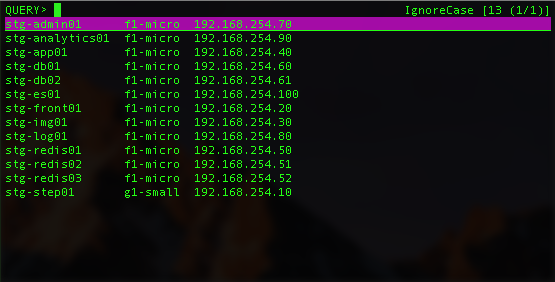
出来たー!

pop2imapを使ってメールデータを移行する

お客さんの環境(さくらレンタルサーバー)から、自前で構築したIMAPSの環境にメールデータを移行したいと話があった。

色々探して、perlのpop2imapってツールを見つけた。
これならサーバーにSSHログイン出来ない環境でも、IMAPかPOP3が動いていればデータの移行が簡単に出来る。

wget http://www.linux-france.org/prj/pop2imap/dist/pop2imap-1.27.tgz

tar zxvf pop2imap-1.27.tgz

cd pop2imap-1.27/

INSTALLを見ると、必要がモジュールが書かれている。

You need : 
- Perl 
  try : perl -v
  try : perl -c pop2imap

- Mail::IMAPClient module 
  try : perl -mMail::IMAPClient -e ''

- Mail::POP3Client module 
  try : perl -mMail::POP3Client -e ''

- Email::Simple module
  try : perl -mEmail::Simple -e ''

- Date::Manip module 
  try : perl -mDate::Manip -e ''

- IO::Socket::SSL  module (optional needed with --ssl1 or --ssl2)
  try : perl -mIO::Socket::SSL -e ''

Any software packager should add all the perl modules dependencies by default
since users can use any option (--ssl*).

これらは入っていなければyumなりCPAMなりでインストールする。
yumの場合は

yum -y install \
perl-Mail-POP3Client.noarch \
perl-Mail-IMAPClient.noarch \
perl-Mail-POP3Client.noarch \
perl-Date-Manip.noarch \
perl-IO-Socket-SSL.noarch

モジュールを入れたら、makeする。

make
make install  # /usr/bin/pop2imap にインストールされる

オプションは直感的に分かるけど、パスワードを平文で打つので、作業後はhistory消しておいた方が良さそう。

pop2imap --help

usage: /usr/bin/pop2imap [options]

Several options are mandatory. See the example below.

--from        <string> : parsed as <user1>@<host1>[:<port1>]
--host1       <string> : "from" POP server. Mandatory.
--port1       <int>    : port to connect. Default is 110 (ssl:995).
--user1       <string> : user to login.   Mandatory.
--password1   <string> : password for the user1. Dangerous, use --passfile1
--passfile1   <string> : password file for the user1. Contains the password.
--ssl1                 : enable ssl on POP connect
--to          <string> : parsed as <user2>@<host2>[:<port2>][/<folder>]
--host2       <string> : "destination" IMAP server. Mandatory.
--port2       <int>    : port to connect. Default is 143 (ssl:993).
--user2       <string> : user to login.   Mandatory.
--password2   <string> : password for the user2. Dangerous, use --passfile2
--passfile2   <string> : password file for the user2. Contains the password.
--ssl2                 : enable ssl on IMAP connect
--starttls2            : use starttls on IMAP connect instead of SSL
--timeout2    <int>    : Connections timeout in seconds. Default is 240.
--folder      <string> : sync to this IMAP folder.
--delete               : delete messages in "from" POP server after
                         a successful transfer. useful in case you
                         want to migrate from one server to another one.
                         They are really deleted when a QUIT command
                         is send.
--idatefromheader      : sets the internal dates on host2 same as the 
                         "Date:" headers from host1. Turned on by default.
--dry                  : do nothing, just print what would be done.
--debug                : debug mode.
--debugimap            : IMAP debug mode.
--debugpop             : POP debug mode.
--tests                : Run non-regression tests
--quiet                : Only print error messages
--version              : print sotfware version.
--help                 : print this message.

Example: to synchronise pop  account "foo" on "pop3.truc.org"
                     to imap account "bar" on "imap.trac.org"

/usr/bin/pop2imap \
   --host1 pop3.troc.org --user1 foo --passfile1 /etc/secret1 \
   --host2 imap.trac.org --user2 bar --passfile2 /etc/secret2


Branched by Phil Carmody <phil.carmody@partner.samsung.com> from:
 $Id: pop2imap,v 1.27 2015/11/03 23:34:02 gilles Exp gilles $ 
      pop2imap copyleft is the GNU General Public License.

使い方

pop2imap --host1 移行元サーバー --user1 移行元ユーザー名 --password1 移行元パスワード --host2 移行先サーバー --user2 移行先ユーザー名 --password2 移行先パスワード -ssl2(IMAPSで接続)

おまけ
historyを削除する

history -c

EC2にswapを増やす

訳あってEC2のt2.nano(メモリ 0.5GB)でCPAMを使いたいけど、CPAMだけで300MB近くメモリを食うので、isntall処理がAbortしてしまう。

#  perl -MCPAN -e shell
Terminal does not support AddHistory.

cpan shell -- CPAN exploration and modules installation (v2.16)
Enter 'h' for help.

cpan[1]> install Mail::IMAPClient
Reading '/root/.cpan/sources/authors/01mailrc.txt.gz'
............................................................................DONE
Reading '/root/.cpan/sources/modules/02packages.details.txt.gz'
  Database was generated on Tue, 10 Apr 2018 14:54:48 GMT
....................................................Killed

遅くてもinstallが出来ればいいので、SWAP付けて逃げる。

# free -m
              total        used        free      shared  buff/cache   available
Mem:            483         174         222          32          86         245
Swap:             0           0           0  ← SWAPがない

/var/swapfileを作成して、SWAPに当てる

# dd if=/dev/zero of=/var/swapfile bs=1M count=1024
1024+0 records in
1024+0 records out
1073741824 bytes (1.1 GB) copied, 15.0153 s, 71.5 MB/s

# mkswap /var/swapfile
mkswap: /var/swapfile: insecure permissions 0644, 0600 suggested.
Setting up swapspace version 1, size = 1024 MiB (1073737728 bytes)
no label, UUID=2311e423-13a4-4451-b081-05ac4074c8bf

# swapon /var/swapfile
swapon: /var/swapfile: insecure permissions 0644, 0600 suggested.

# free -m
              total        used        free      shared  buff/cache   available
Mem:            483         175           5          32         302         244
Swap:          1023           0        1023  ← SWAP増えた!

nginxでのリダイレクト

nginxが.htaccess使えないの忘れていたので、HTTPで来たアクセスをHTTPSにリダイレクトする設定を今更書いた

server {
    listen       80;
    server_name  www.jhhk-family.net;
    return 301 http://www.jhhk-family.net/$request_uri;
}

SMTPSとIMAPSで安全なセキュアなメールサーバーを作る

AWSにメールサーバーを移設した際に、STARTSSLからSMTPSとIMAPSの環境に変更したので、そのメモ


環境:
AWS EC2 (Amazon Linux AMI 2017.09.1 (HVM), SSD Volume Type)

セキュリティグループ:
22/tcp , 25/tcp, 80/tcp(Let’s Encryptの認証用に一時的に開ける), 465/tcp, 993/tcp を開けておく。


必要なパッケージをインストール

yum install postfix dovecot cyrus-sasl cyrus-sasl-plain

LetsEncryptでメールサーバー用の証明書を発行
wordpress をELB+EC2でHTTPS通信させる
を参照


(SMTPSに必要な箇所のみ記載)
/etc/postfix/postfix.cf

smtpd_sasl_auth_enable = yes
smtpd_recipient_restrictions =
    permit_mynetworks
    permit_sasl_authenticated
    reject_unauth_destination

smtp_tls_security_level = may
smtpd_tls_security_level = may
smtpd_tls_cert_file = /etc/letsencrypt/live/mail.jhhk-family.net/fullchain.pem
smtpd_tls_key_file = /etc/letsencrypt/live/mail.jhhk-family.net/privkey.pem
smtpd_tls_session_cache_database = btree:/var/lib/postfix/smtpd_scache
tls_high_cipherlist = kEECDH:+kEECDH+SHA:kEDH:+kEDH+SHA:+kEDH+CAMELLIA:kECDH:+kECDH+SHA:kRSA:+kRSA+SHA:+kRSA+CAMELLIA:!aNULL:!eNULL:!SSLv2:!RC4:!MD5:!DES:!EXP:!SEED:!IDEA:!3DES
smtp_tls_ciphers = high
smtpd_tls_ciphers = high
smtpd_tls_mandatory_ciphers = high

/etc/postfix/master.cf

smtps     inet  n       -       n       -       -       smtpd
  -o smtpd_tls_wrappermode=yes
  -o smtpd_sasl_auth_enable=yes
#  -o smtpd_client_restrictions=permit_sasl_authenticated,reject
#  -o milter_macro_daemon_name=ORIGINATING

smtpd_client_restrictionsは未設定。必要に応じて。

/etc/dovecot/conf.d/10-auth.conf

auth_mechanisms = plain
!include auth-system.conf.ext

/etc/dovecot/conf.d/10-ssl.conf

ssl = yes
ssl_cert = </etc/letsencrypt/live/mail.jhhk-family.net/fullchain.pem
ssl_key = </etc/letsencrypt/live/mail.jhhk-family.net/privkey.pem
ssl_protocols = !SSLv2 !SSLv3 !TLSv1
ssl_cipher_list = HIGH:MEDIUM:!aNULL:!MD5:!SEED:!IDEA:!RC4:!3DES:!RSA

/etc/dovecot/conf.d/10-master.conf

service imap-login {
#  inet_listener imap {
#    port = 143
#  }
  inet_listener imaps {
    port = 993
    ssl = yes
  }

最後にpostfix、dovecot、saslを起動する。

service saslauthd start
service postfix start
service dovecot start